
I started using the Octatrack as a means to produce full pieces of music without a computer. After 6 months invested, I was in love with my new creative process, but completely unable to finish a track. After years producing drum & bass music for label releases, and spending months on complex mixes with long FX chains, buses, and convoluted compression set ups, I found I was stuck with only what I could achieve inside the Octatrack. No mixdown, no sidechains, no buses, no polished, finished track at the end of the process. Nothing I would be happy to release.
I listed my Octatrack for sale on Elektronauts.
I received a reply from a user called jbone1313. He had developed an Ableton template based around a series of MIDI clips and automations that he told me could solve this problem, yielding full stems for all the tracks in my project, including crossfader movements and scene changes. He even provided me with a prototype project file.
Having fully dissected the project, recreated it a few times, tested thoroughly, I decided to document how it works so that it can be of use to others.
This project works with a relatively straightforward concept. You perform a song once, while Ableton records all the midi data for your crossfader movements and scene changes to a MIDI clip. Then, you enter a couple of values in a couple of places, hit play and walk away. When you come back, you’ll have an audio file containing individual stems for all the tracks from your Octatrack.
Some Caveats:
-
This method only records your crossfader movements and scene changes. If you want your performance to include things like encoder movements or live-played trigs, you’ll have to do some extra work. I won’t cover that stuff here, but I can give you an idea of how to do it (individual midi tracks for each OT track, multiple armed channels etc).
-
Manual mutes do not work. We need to use the ‘solo’ functionality to bounce each track out individually, and this overrides track mutes. However, arrangement mutes do work, so if you want to use mutes as part of your performance, you’ll need to use them within the arranger, and not on-the-fly. You can also just edit the audio clips at the end if you prefer.
-
Ableton does not record MIDI program changes. This means pattern changes don’t work either. You’ll need to use arranger mode for this too.
Ableton Setup
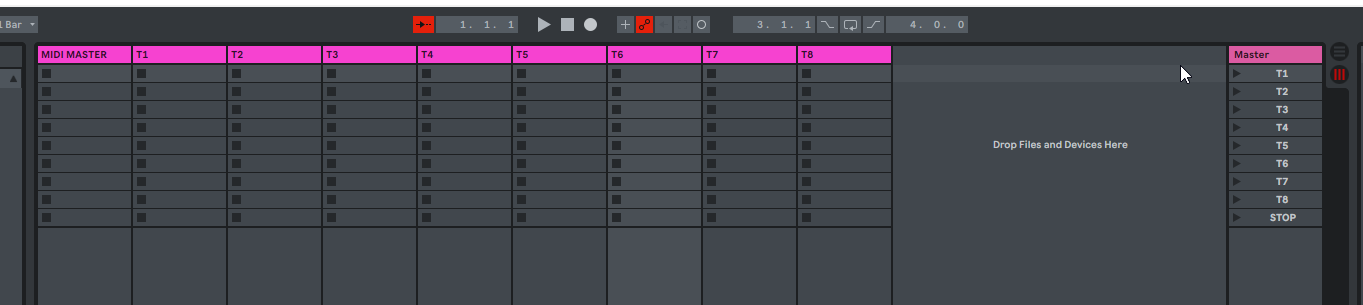
Setup 9 scenes, named T1-T8 and STOP.
Setup 9 MIDI channels, named T1-T8 and MIDI MASTER.
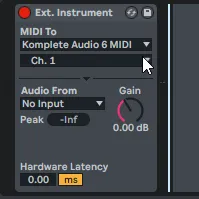
On each MIDI channels, add an External Instrument device, and map each to the correct midi channel for its respective track. By default, the tracks are on channels 1-8. For the MIDI MASTER channel, use the same MIDI channel that the T1 channel uses.

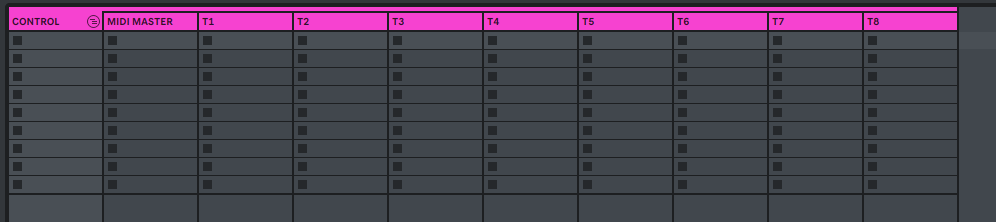
Group all the MIDI channels. We’ll call the group CONTROL.
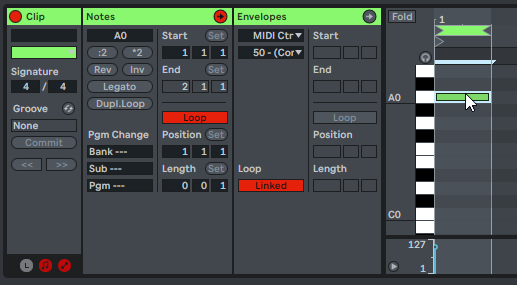
In the T1 channel, create a MIDI clip with a length of 1/32 note, and add an automation on MIDI CC 50, setting a value of 0.

Copy this MIDI clip into every cell on the T1-T8 channels, except for the final STOP scene.

On the T1 MIDI channel, and in the T1 scene row, change this automation to a value of >1, with a slope leading up to 127. We should be able to set this to 127 and leave it at that, but I found that sometimes due to latency it may miss this very first automation. The slope means that it’s constantly receiving new values until we hit the 127 point, so it’ll solo the track as soon as it’s able to do so.

Change the clip colour, so we know this is a ‘solo’ clip.
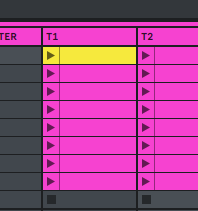
Copy the new clip to T2, T3 and so on.

On the END scene, create a 1/32 long MIDI clip, containing nothing but a single A0 note. Let’s give this clip a new colour as well, so we know it’s our ‘stop’ clip.
Copy the STOP clip to all the MIDI tracks in our group.
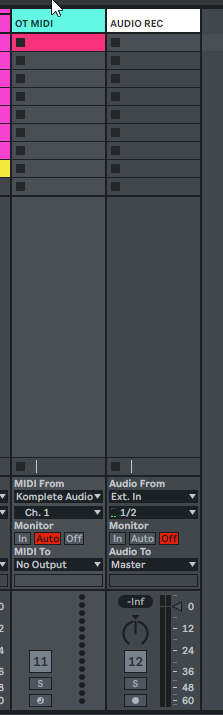
Outside of this group, create a MIDI track that receives midi from the Octatrack, on the same MIDI channel as T1. This is your master MIDI track, in which you will record your performance.
Outside the group, create an audio track, to record your stems into, make sure this is set to receive audio from the correct input. We’ll call this track AUDIO REC.
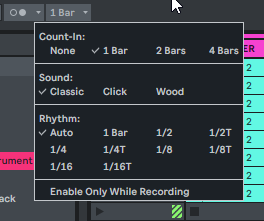
Set up a 1 bar count-in, under the metronome settings, for when we want to record. You will need this later.
That’s the main setup done! Next, let’s get the OT ready…
Octatrack Setup
Connect your Octatrack to your MIDI interface, so it is both sending and receiving MIDI from your computer.
Go to PROJ -> MIDI -> SYNC, and set TRANSP and CLOCK to RECV.
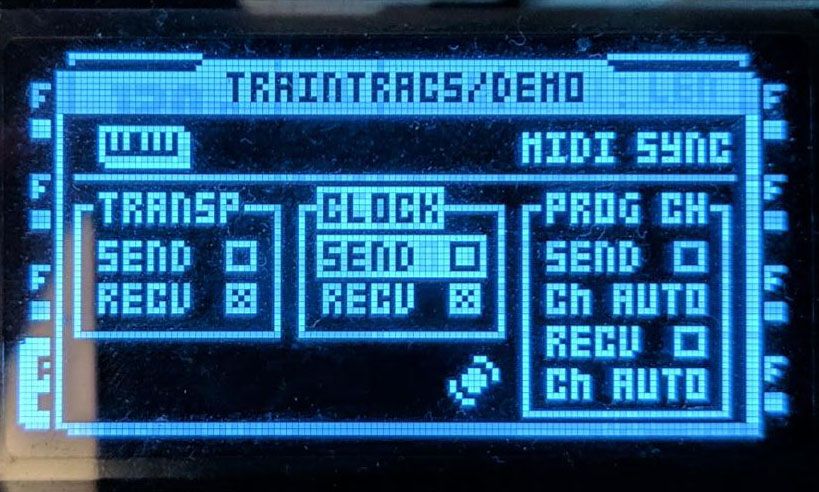
Go to PROJ -> MIDI -> CHANNELS and make sure your track channels match those that are set in Ableton

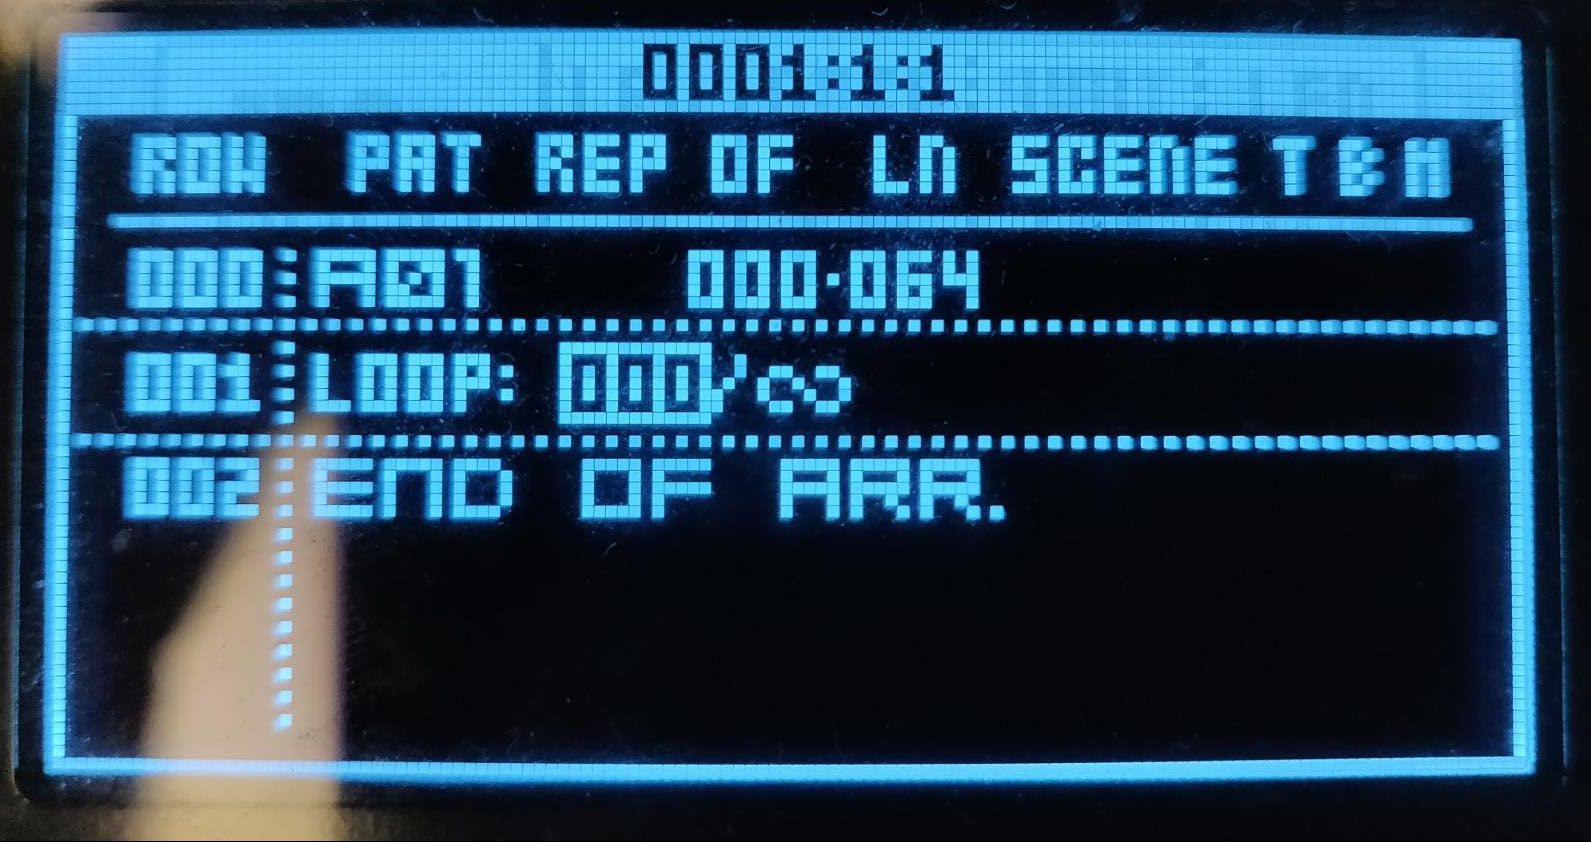
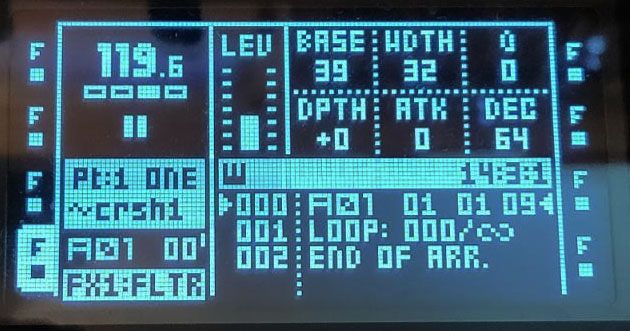
Either create a new arrangement, or open your existing arrangement. For my test, I’m just using a simple, 64 step pattern (4 bars).
Add ‘LOOP 00/∞’ to final row.
Find out the length of your arrangement. To do this, add a row before the LOOP, select the left-most column, press YES, and read the text in the header. The text consists of three numbers, representing bars, beats and sixteenths, respectively. This is the starting measure for the extra row you just added. To calculate the length of the arrangement up until this beat, simply reduce this number appropriately. For example, if the starting measure of the new row is “73 1 1”, the length of the arrangement up until that point must be 72 bars. The means the actual length of your arrangement is “72 0 0”.
Make a note of this number. You’ll need it.
The example in the following image would have a length of “4 0 0”.
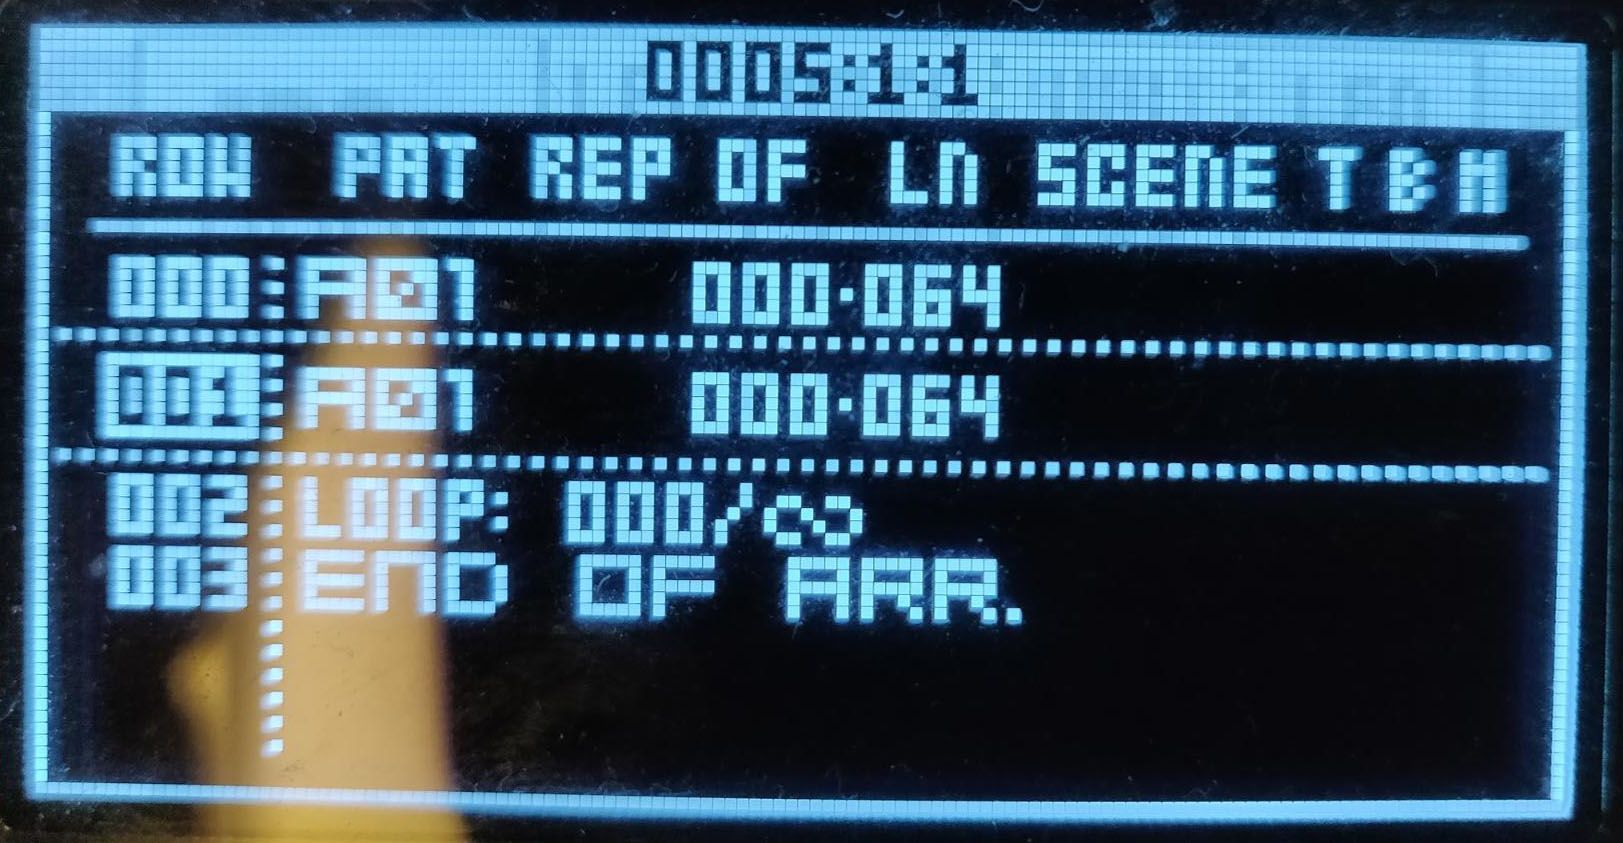
Remove the new row you just created to figure out the length.
Make sure Arr Mode is activated:
Ready to go!
In Ableton, arm the OT MIDI channel and hit the record button in any of the cells. After the 1-bar count-in we set up previously, your Octatrack should start playing through your arrangement.
Do your thing - move the crossfader and switch scenes. When you’re done, just stop the recording in Ableton.
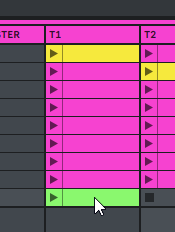
Copy the new MIDI clip you created into all scenes on the MIDI MASTER channel.
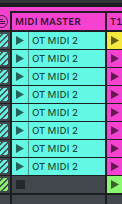
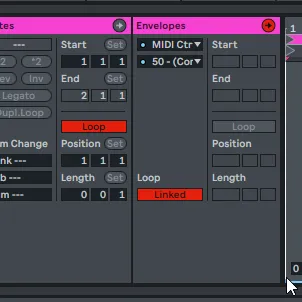
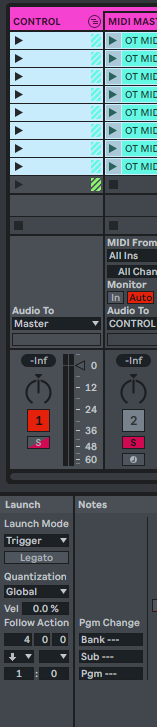
Select all the cells in the CONTROL channel, except for the last one, corresponding to the STOP scene. Open the Launch Box by clicking the first of the three circles at the bottom of the Clip View. Set the Follow Action Time to the number of bars in your Octatrack arrangement (we figured this out in step 6), and set Follow Action A to ‘Next’, as illustrated below:
Arm your AUDIO REC channel, hit the record button in any of the cells, and before the count-in finishes, hit the play button on the first row in your CONTROL track.

Walk away for approximately 8 times the length of your tune. When you come back, you’ll have an audio clip in the AUDIO REC track, which contains stems for each individual track!
Tips:
- Drag scenes up and down to change the order in which your tracks are recorded
- Move the STOP scene above any tracks you want to skip entirely